31 March 2016

BurdaStyle shirt for Mam

Just a quick post here to show the latest shirt I've made for Mam.  It is the same as the one in the previous post but made from some pretty cotton that is imported from Japan.  I made a narrow shoulder adjustment using Nancy Zieman's Pivot and Slide method as the first shirt was a bit too wide.

I will be giving both of these to Mam for her 80th birthday coming up in a few weeks.


20 March 2016

BurdaStyle shirt, testing Northumberland Star block quilt

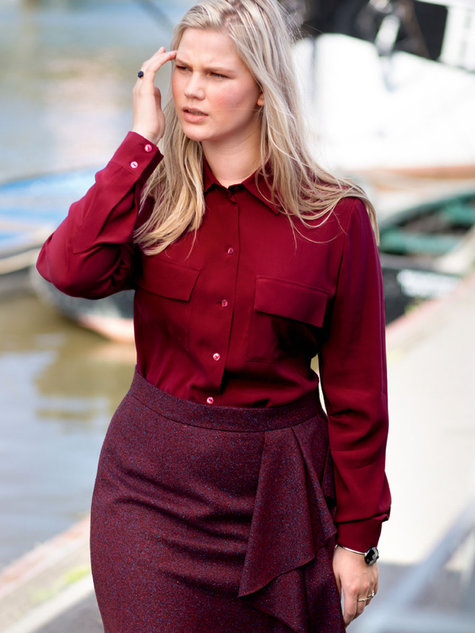
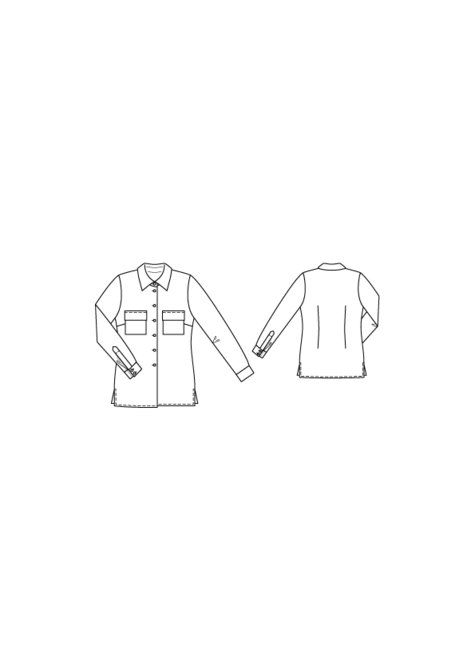
My mother has been having trouble finding the style of shirt in shops that she likes.  She likes ones similar to my New Look Shirt that I blogged about here.  She takes a larger size than I do and the New Look pattern isn't large enough for her, so I scoured my BurdaStyle magazines to find a pattern I could use for her.  I found #129 in the 11/2015 edition that I thought I would be able to adapt to her tastes.  This is the magazine photo:
129-112015-b_large129-112015-b_large

There were a few changes I needed to make.  I didn't want long sleeves and instead of straight hems I wanted a curved hem.  I used my New Look pattern to redraft the bottom of the shirt and to change the sleeves.  Here is the completed shirt:

This shirt was fabric from Smart Dress Fabrics and cost $11 for 2.2m x 150cm

I have some more material to make her another shirt.  She has tried it on and it has turned out well, though next time I will make a narrow shoulder adjustment.

In my last post I mentioned I was interested in making a quilt using the Northumberland Star pattern. I've made up a couple of practice blocks to see how they turned out and to make sure I can do a decent job of it.  The one on the left was my first block and some of the joins are a bit out.  For the second one I followed a tip to use a scant 1/4 inch seam instead of a full 1/4 inch and it turned out much better.  I think I'll do another couple of blocks and turn these into a table runner.  If I'm still happy then a shopping trip will be needed to get fabric for a bed quilt. My favourite flowers are daffodils and I have a daffodil Maling plate on display on my dresser, so I'd love to find some daffodil fabric for the centre blocks.


12 March 2016

StyleArc Barb pants and cross stitch Spirit of Winter framed, visit to quilt show

One clothing finish this week.  A pair of Style Arc Barb pants.  These are made from bengaline, the colour is called petrol and is a greeny blue.  Fabric was from Spotlight, unfortunately I forgot to record how much this was and how much fabric I had. I think around $20.

I got Spirit of Winter back from the framers this week.


 I've moved my cross stitch pictures around in my living room. I'm not so keen on some of the older pieces now.  The more recent ones I've done are so much more like paintings I really prefer these so want them to have pride of place.  This is the main wall behind my couch.

I also visited a quilters show put on by the Western Quilters circle.  There were some beautiful quilts there.
I'm quite keen on trying to make a quilt for my bed.  I've discovered a design called the Northumberland Star.  Being originally from the North East of England this seems an obvious choice for me to try.   I've found this tutorial here at Quilters Cache.
I'm practicing first by doing 3 blocks which I'll make into a table runner for my dining table.  If I'm any good at it and if I think I'll enjoy it, then I'll get some fabric to make a quilt.  I've pieced 2 blocks so far but no photos yet.

6 March 2016

New Look shirt and Burdastyle top

I've made yet another shirt using New Look 6963.  This time I went with the short version with short sleeves.


 This was made from cotton poplin from Spotlight.  I had a 2.5 metre x 112cm length that cost $17.48.

I also made a pleated blouse from BurdaStyle magazine 10/2015 #115A.

I struggled with the top part and couldn't understand the Burda instructions:" turn facing to inside and pull the front pleat section to outside. Baste loose neck edge of facing to facing fold line.  Lay pleat over facing edge, to inside, and sew to inside facing edge. Sew inside facing edge to seams."
I tried it out on scraps of fabric first, but each time I did what I thought the instructions were I ended up with a raw edge of fabric poking out from the seam.  In the end I did a usual facing finish. That also wasn't successful, as the instructions were to just baste both of the side pleats and when I was sewing the facing the basting on one of the pleats came undone.  I tried to refold it as I was sewing on the facing.  When I finished the facing and understitched it I found I'd folded the pleat the wrong way.  I decided I really couldn't live with it the wrong way and so had to unpick the facing and understitiching to refold it correctly.  

Next problem:  I was concerned the weight of the pleats would pull the facing through to the front, so I thought I would top stitch the neck.   Big mistake, when I had top stitched it  I hated the look of it, but unpicking it wasn't really an option as there would likely be visible holes from the needle.  So I ended up making some bias binding from left over fabric and putting that on.  For anyone looking at making it and worried about the weight of the pleats, I recommend just hand stitching the facing on the back at strategic points, I ended up doing this as well.

I wanted something a bit different and like the 'handkerchief' pieces at the side.  Though a bit worried about it being at the hips, emphasising the broadest part of my body, However if I wear with slim trousers it will look OK.  I also managed to make a mistake on these, my mistake entirely as I didn't read the instructions properly.  It said to hem the narrow ends and one long end.  I read it as one narrow end and one long end and so attached the unhemmed narrow end to the side seam of the top,  it should have been the unhemmed long end attached to the tops side seam, after folding the rectange in half, as per the tech drawing. Rather than unpicking it all I just folded in half, stitched a narrow end to the seam allowance and then stitched across the top.  A bit of a fudge, but only another sewer will notice and then they'll have to look closely.

This was made from faille from Spotlight I had 1.5m @ 148cm and cost $11.69.


Like my photo collages?  I just found this free software at Fotor.  So easy to use, expect to see more collages in future posts.

23 February 2016

more culottes and revisited blouse

I've made my fourth pair of culottes.  These will do for slightly cooler weather, though since it has been around 26C and very humid since Christmas cooler weather is hard to imagine.  Again these are from Burdastyle 8/15 #131.


These were made from fabric described by Spotlight as silk tweed.  They are lightweight, but a bit heavier than the rayon culottes I've made and lighter than the broadcloth ones.  The fabric was $15 for 2.5 metres at 148cm wide.


I revisited my Burdastyle blouse from July 2015 #109. I blogged about it here. I really wasn't happy with the amount of flounce around my bottom and felt I would never wear it.  I wanted to remove some of the bulk of fabric and reduce the flounces below the waist to one instead of two.  The flounce immediately below the waist is narrower than the bottom one.  I couldn't remove just the bottom flounce as the blouse would then be too short.  So I had to unstitch both flounces and unpick the invisible zip in the side seam.  As the seams had all been overlocked, if I'd used a regular 5/8inch seam the blouse would have been a bit too short, so I sewed with a 1/4" inch seam.

Photos before change

And after


I may have taken out a bit too much bulk as it is a bit on the tight side around the hips now.  I'm still not sure when or if I'll wear it but I think there is more chance it will get out of the wardrobe now.

14 February 2016

Culottes, 2 tops and Spirit of Winter is finished!!!

After 4 1/2 years of stitching, Spirit of Winter is finished.
Now she just needs to be framed.
The stats:  Started 1 September 2011.  Finished 9 February 2016.  1173 stitching hours, 152,600 stitches.  Stitched over one on 22ct Hardanger.

Next up is a Golden Kite design, Gossips by artist Daniel Ridgway Knight.  The chart is available in blended colours or solid colours.  I am doing the solid colours version.  This design is even bigger than Spirit, at 400x 502 stitches wide, that's 200,800 stitches and on 22ct Hardanger the finished size will be 18.2" x 22.8". It has 185 colours, that's a lot of thread.  Fortunately I have such a huge stash of thread I've only needed to buy a small quantity.  I am busy kitting this up now.


Gossips - Solid colors

Daniel Ridgway Knight was an American artist (1839-1924) who lived in France from 1872.  His work focused mainly on the French peasants.  He had a rather idyllic view of them, painting leisurely scenes rather than the reality of the hard lives they faced.

My sewing over the last couple of weeks has been repeat sewing.  I made some more BurdaStyle culottes from 8/15 #131.


I stupidly made the invisible side zip far too long, its almost down to my knees instead of just past the bottom of the pocket. This creates a bit of bulk on the left side seam.  These are made of rayon from Spotlight $24.89 for 2mx148cm.

I made 2 more Colette Sorbetto top.  This one is made from leftover material, voile, rayon and gingham.  There wasn't enough material to do a front pleat, so I ignored the pleat part on the pattern and put fold of fabric on inner pleat line.  Cost $0


This one is made from poplin from Spotlight.  I had 2 metres of this and still have .9metres left over.  $10.12


30 January 2016

BurdaStyle Easy 1/2014 1a Blouson jacket

After last weeks finish of the shift dress I wanted to remake this jacket that was done a couple of weeks ago in the corduroy fabric.  I used the left over fabric from the shift dress, using the cotton sateen for the front and back and the crepe for the sleeves.


I've seen this style in the shops done in lightweight fabric for a cool summer cover up.  As it has a quite heavy zip ideally I should have created a front facing to support it.  However I didn't have enough fabric for that, so instead I used an interfacing on the front panels instead.  As the crepe is very stretchy it wouldn't be any good for long sleeves as my elbows would soon stretch it out of shape, so I used view A for the short sleeves.  I lengthened the sleeves by about 1 1/2 inches.

I made a boo-boo on one of the sleeves.  The sleeves are in 2 pieces, a front side and a back side. As both sides of the crepe are the same, I managed to sew one sleeve wrong sides together instead of right sides together.  This meant when joining to the bodice the seam was on the outside of the garment.  By the time I'd discovered the mistake  I'd sewn the outer seam and the inner/underarm seam and overlocked them.  To unstitch I'd have to undo both my sewing and overlocking and then work with a very narrow seam allowance.  As the crepe is thin and stretchy I didn't think unstitching would be successful, I'd stretch and poke holes in the fabric.  So my other options were either to go shopping for more fabric to redo both sleeves, or to find some way to disguise the fact that the seam was on the outside.  I elected to go with disguising the seam.  I found some blue trim in my stash and sewed that to the outside of both sleeves.  I'm quite pleased with how that worked out.

 Overall this has worked out as a nice cool casual summer cover up.  Ideal for when the mornings and evenings cool down a bit.

More photos