11 June 2016

StyleArc Barb pants, KwikSew 3678 and quilt block

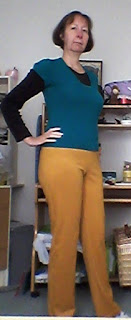
I got yet another pair of StyleArc Barb pants completed.  I think this is my 5th pair now.  These are in a mustard coloured ponte from Spotlight.

I also made a sweatshirt and pants using KwikSew 3678.
I made this using a husky polar fleece from Spotlight.  It is a very warm fleece so should be good when the colder weather arrives.  Though the other day it got to 20C in Auckland, still warm for middle of winter!
The pant legs are all in one piece, so the only seam to join is the inner leg and crotch. The pants have an elastic waist and the pattern has to add a cord, I didn't bother with the cord.  The elastic is enough to hold the pants up, so fastening and unfastening the cord would just annoy me when I need to take a bathroom break.   The pants have back pockets, and the jacket has kangaroo pockets.  The zip sits nicely in a facing so only the teeth show, no tape is visible on this inside of the jacket.

 As I could do most of the sewing on my overlocker it sewed up quite quickly.  Most of the time sewing these was spent on the pockets and facing.

Side and back views:


I've also experimented with another quilt block.  I like this design which is a free design on lilysquilts blog.   

At the moment I just have it set to one side, until I decide what to do with it.  I'm trying making blocks as I really like home made quilts.  The ones I prefer are where the blocks are the same.  This one creates quite an interesting pattern when blocks are joined.  A google search found this image:
Image result for lynne bob square pants

I love how the corner blocks create another smaller square block when they are all joined.  

My concern is that I will get bored making the same block over and over, so I can't decide whether to make one or not.  Plus the cost of material and batting isn't cheap, so before I make those purchases I need to be sure it's something I'll not get fed up and abandon halfway through.

My next project will be another KwikSew jacket in velour.  I've washed the fabric today so should get it sewn later this week.

30 May 2016

BurdaStyle 2/16 121 High collar sweatshirt, with how I did my zippers, Style Arc Barb pants

After a long summer, we've made a quick transition to winter.  Just a couple of weeks ago temperatures were in the mid twenties, but the last week has been raining and temperature down to around 19C.  Time to get the winter wardrobe started.

I've had my eye on this sweatshirt even before the magazine became available here in New Zealand.  I got some lovely orange sweatshirt fabric and was ready to start.  First of all, here is the completed garment.


I love how you can adjust the zip lengths to change how the collar looks.
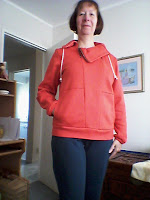
Love the pockets as well. 


After reading other reviews it seems the instructions for the zippers were hard to follow.  As I've made a few bags, the instructions were very similar to inserting a zip pocket into a bag.   I practiced first on some scraps of fabric, but  when it came to doing the garment the first zip went in perfectly but I struggled to get the second zip looking neat.  As I believe in learning from my mistakes, and also because I want to make this again, after I had finished I practiced again on some scraps and put a tutorial together.

ETA:  I've found this tutorial from Tilly and the buttons for an exposed zip insertion that I think would work better.  She uses interfacing rather than lining which I think would be better as would give more support.
  1. Pin lining to fabric right sides together.  Put these so the lining is centred on the slit mark.  If using a lining that frays easily, use pinking shears to cut out the 4cm square.  Instructions are to sew 5mm next to the seam.  It doesn't say if this is closest to the edge of fabric or further away.  The diagram provided appears to show the stitching line as being further away, so for a 5/8" seam it would be 6.5/8" from edge of fabric  (5mm= 1.5/8").  OK, I know there is no such thing as a 1.5/8" but it's too hard to convert to 16th's.  Or in other words 6.5/8" is between 3/4" and 7/8".  However if you sew the lining at 6.5/8" the lining will be exposed when you sew the zip in at 5/8".  So I decided to interpret this as sew at 3.5/8" from edge of fabric.
It also doesn't say how far from the slit line the horizontal line should be sewn.  It needs to be a reasonable distance so raw edges of lining don't poke through when it is turned to the inside, so I sewed the horizontal line at 5/8" below slit mark.


2. Snip through both fabric and lining on the diagonal, right into the corner without cutting threads

3. Fold lining to inside and press so you get a nice sharp edge.
Right side fabric

wrong side fabric


 4. Do the same for all 4 pieces of lining.  It is essential that they match up, so check the side fronts and centre front match before sewing the lining and again, before snipping. When the seams are sewn you want a nice U shape.


5. Pin centre front and side front together and sew 5/8" seam from hem to lining.
6.  Instructions say to go on to stitch lining together.  Where??  After much practice I figured the only place you could sew the lining together was on the side running parallel to the seam.

7.  This now gives a nice casing for the bottom of the zip to sit in.  The bottom of the lining is open, so the ends of the tape can sit in there without twisting up.  When inserting the zip, this can be stitched at the 5/8" seam without the lining showing on the right side.
Right side fabric

wrong side fabric with ends of zip tape inserted.
8.  Insert the zip as usual.

When finished the ends of the zipper tape can be sewn to the seam allowance and lining, and to the casing part of the lining.

The fabric for my sweatshirt was from Spotlight and I bought 2m x 148cm for $12.33.  The pattern called for 2.05m x 130cm.  As my fabric was a bit wider I thought I'd get the pattern cut out OK, however I had to be very imaginative with my placement of pattern pieces and only just managed to get everything.  Next time, get 2.2metres.


Also ready for winter are another pair of Barb pants by StyleArc.  These are my 4th pair of Barb pants.  They are a teal coloured ponte, from Spotlight 2m x 147cm for $21.58.  I didn't need all that fabric so have .85metres remaining.  These will be for lounging around the house.  I'm about to start my 5th pair in a mustard ponte.


22 May 2016

StyleArc Barb pants, BurdaStyle layered long sleeve shirt and Hospice Op shop haul

Well the last couple of weeks have been eventful.  I've been without a car the last few days as a woman drove into the back of me at an intersection.  No injuries, thank goodness.  My rear bumper was damaged.  Only her licence plate was damaged.  Why is it that the innocent parties in these, always come off second best?

Oh well, I've used the time to get on with some sewing.  First up another pair of Barb pants from StyleArc.

These were made with fabric from SmartDress fabrics.  They are a stretch woven.  I bought 2m x 147cm for $19.90.  There is still some left over.  I may use that left over fabric to make the BurdaStyle top that I made here .  I should have enough of this and left over fabric from the greeny/blue Bengaline trousers to make this top.  Then the top would co-ordinate with both sets of trousers.  Sounds cool, but I'll have to see how the fabrics look together.

I made a top from the BurdaStyle 1/16 issue #103A.  This is their picture and description.

A bit of an eye trick. Up close you will see that there is a longsleeve shell made of a slightly transparent fine knit fabric that looks opaque on the body. The added interest is the waterfall scoop at the back.
103a-012016-b_thumb

And my version

This top was again made with fabric from SmartDress fabrics.  I actually got the quantities of fabric mixed up.  The outer fabric needed 1.3m and the inner needed .8m.  I bought 1meter of the outer fabric and 1.5 metre of the inner.  This meant I have enough left over of the inner for another top, but required creative cutting for the outer fabric.   I didn't have enough to cut the back in one piece and on the fold as required in the pattern, so I had to cut one piece up to the shoulders, on the fold. Then across the shoulders I had to cut 2 pieces.  So a one piece back became 3 pieces.  Fortunately the waterfall collar on the back disguises where the fabric has been sewn together.  I also didn't have enough to do any pattern matching.    The outer fabric is quite a sheer knit, while the inner fabric is a t-shirt weight knit.  The fabric cost $7.50 for the inner, and $5 for the outer.  So $12.50 in total, with some left over for another similar top or a t-shirt.

I was able to pick my car up from the insurance service centre today.  On the way home I decided to call in at the local hospice shop.  For the first time I've seen, they had a table set up with fabric and fill a bag for $10.  I ended up filling 2 bags.  I took home a haul of 7 fabrics or 18.5 metres.  A couple of the fabrics were woollens so they took up a lot of space in the bag, otherwise I could have bought even more.
 I will add these to my Fabric stash page shortly.


9 May 2016

BurdaStyle velvet jacket and progress on Gossips and major shopping spree

Well I haven't posted for a couple of weeks because I have been very busy creating a velvet jacket.

So you don't need to scroll down, here it is.


  I bought the blue velvet a while ago as I absolutely loved it.  I then had to hunt for a suitable pattern.  I settled on BurdaStyle 08/2015 # 106A.   Once I had decided on this pattern I had to go back for some red velvet as it has contrast pockets, yoke and sleeve plackets.  I also got some lovely bright blue lining as it is fully lined.

As velvet is a very tricky fabric to work with I read lots of articles on how to sew with velvet.  It is very important it is cut on the nap and it can be tricky to stop fabric slipping when sewing, so I used my walking foot for this.   Once I had done my studying it was time to cut out the fabric.  I did this, then double checked the pattern.  This is rated 3 1/2 stars, which equates to difficulty level of Advanced level sewing with special features.  Uh-oh, that sounded way out of my league. I classify myself as an Advanced Beginner.  However it was too late to change my mind, the fabric was cut.  So I decided to just try my best, if it turned out to be disastrous it would just have to be a learning curve.  However  I'm really pleased with how it turned out.  Maybe its' time to upgrade my Sewing skills level on Pattern Review.

The only real problem I had was sewing the lining to the pockets.  The lining fabric slipped terribly from the velvet and I had to handtack around twice before machine sewing.  When attaching it to the velvet facing I was very, very careful to ensure it didn't slip, again doing a lot of hand tacking first.
There is also a heap of hand sewing in this.  The bottom hem of the jacket is all sewn by hand, though I used the machine to blind hem the sleeves.  Then the lining is handsewn to the bottom seam of the jacket and also to the hem of the sleeves.  It was very time consuming, taking around 38 hours.

 However I love it and feel very proud of my achievement so it is time well spent.  Here are more photos.


I've also completed page 3 of Gossips, so here is an update

the blue lines are a frixion pen I use for marking grids of 10 x 10.  They will come out when ironed.  The top of the church is now visible.  I'm hoping the next few pages will go reasonably quickly as it is nearly all sky and not much confetti, yay.

Today I went on a major shopping spree.

I went to SmartDress fabrics in Mt Albert and bought 8 pieces of fabric, and then went to Spotlight and bought some denim and ponte.  I've added them to my fabric stash page along with pictures of what I want to make.  These should keep me going a while, however I still want to buy some fleece to make track pants and sweatshirts.

These are the fabric I bought, unfortunately the colours haven't come out very well at all.  That bright blue at the top right is actually a deep purple, and the purple on the bottom photo at top right is actually red and one of the greys is a indigo denim, and the other is a forest green.


23 April 2016

BurdaStyle 8/15 124a Ponte Top with 3/4 sleeves

I've been wanting to make this top for a while now, but over summer I wanted to concentrate on lighter weight clothes.  Now we are into autumn I finally got around to making it.

This is the magazine photo and description:
124b-082015-b_large
This form-fitting shirt is for experienced seamstresses who enjoy a challenge and possibly puzzles because all parts must fit together exactly right. It’s a structured top and much more than just your average “long sleeve shirt” as you can easily dress it up with a pleated skirt.

It is also available in a dress length.

I got some ponte from Spotlight to make this.  It needed .8m x 147cm of each colour.  It has an invisible zip in the back.  It took careful sewing to ensure the colour blocks were carefully matched and no material got puckered when doing the corners.  I'm pretty pleased with how mine turned out.


Today is my mothers 80th birthday.  I wore this top with the straight black skirt above when we went out for lunch.  It feels really smart.

I wouldn't mind making this again in different colours.

12 April 2016

Narrow Pleated Skirt in corduroy

I've had some corduroy in my stash for almost a year.  It was on the special table at Spotlight and cost  just $10 for 2 metres, though it was just 112cm wide.

The pattern I had in mind was this from the 2/2015 issue of BurdaStyle magazine
Юбка с запахом и встречными складками

I patiently traced out all of the pattern, laid the pattern out on the fabric - and I was about 20cm short on fabric.  So back to the magazines.  This time I found #107 in the 10/2015 issue

107-102015-b_large

It is described as :This skirt pattern is a nice piece to be made with a wool material for colder weather. It has narrows pleats, a front zipper and small slit.

Not included in the description are side pockets and a faux flap pocket on the back.

This skirt had a lot of challenges for me.  My first skirt vent, my first fly zipper.  The back has a faux flap pocket, again a first for me.  BurdaStyle instructions assume you know how to do things, so I spent a lot of time looking at various YouTube videos on how to do skirt vents and fly zippers.  Once I understood them, the BurdaStyle instructions made sense.  However the faux flap pocket had me stumped.  I couldn't  find any tutorials to help, so ended up doing it my own way.  The skirt pockets and inside the flap are lined.  I used some remanant lining I had left over after lining my linen jacket..  It is a lavender colour so goes nicely with the grey corduroy.

Here is my finished skirt.


I had cut the waistband about 1inch longer than the pattern called for thinking I could trim it if it was too long.  If anything it was a touch too short.  Next time I'll add about 3 inches to it.  I blind stitched the hem for a smooth finish.  I like the waistband, it is cut quite broad and doubled over, so with the interfacing it is very firm.

 I am really happy with this.  It is a lovely casual skirt.  I met a friend for lunch yesterday and wore this.  I'd like to make a one in denim and another in a heavy cotton.

5 April 2016

BurdaStyle magazine November 2015

 I finished this top from the November issue.  This is the magazine photo and info:
109a-112015-b-burda-style-bluse-naehen_325x433-id364457-7782c961bb0467079eb67cd585c35bc9_thumb
This sweet blouse in a printed silk features little bows that are tied at each of the sleeve hems. It features a round crew-neck with a slight keyhole cutout that is cinched with a loop and knob.

The description is a bit misleading as it is a bit more than a slight keyhole cutout.  I found that keyhole was way too low, below my bra line so I ended up hand stitching 4 inches closed.  The loop and knob is a loop and button closure.  I was very happy with the button.  I had just this one navy and pink button in my button box and it perfectly matched the navy background and pink fabric.


Apart from the low neckline I like the top.  It is gathered at both front and back neckline which gives quite a pretty effect.  I made this in viscose from SmartDress fabrics in Mt Albert, Auckland.  I had 1.4 metres at 150cm wide and I needed all of the fabric.  Total cost was $13.93.