I made this pretty summer dress from BurdaStyle 7/15, #115.
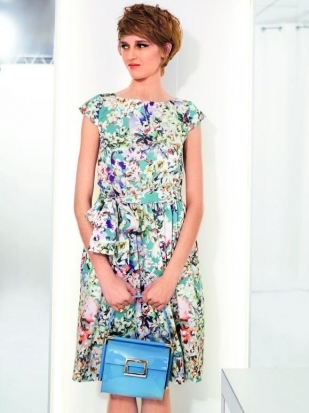 The magazine description says: Dress with short sleeves and tie belt. Dress in pastel floral fabric is utterly enchanting with its mini-sleeves and boat neckline. Elastic, stretched from the inside and sewn on at the waist, ensures that it sits perfectly. Over it the tie belt is tied in a blow. The wide band on the hem means that it falls nicely.
|
|
The fabric I chose was a voile which was very sheer. As the pattern didn't have a lining, I had to work out how to line a dress myself. I was proud of being able to figure it out as I've never lined a dress before and trying to find an online tutorial proved impossible, all I could find was how to line sleeveless bodices. I chose a red rayon for the lining. Rayon as it will be cool and breathable for the summer, and red as after trying a few colours under the voile, the red made the red flowers in the voile really zing. I ended up lining the dress by making the bodice (without sleeves) in the lining fabric by constructing exactly as the voile, including darts. I attached it at the neck and basted at armholes and waist, so these could then be treated as one piece of fabric when adding sleeves and skirt. The lining for the skirt was cut the same size as the voile and hemmed. The skirt piece in the voile had the bottom hem piece attached. I then basted the voile and lining at the waist, gathered both as one piece of fabric and sewed to the bodice.
This dress marked my first time at lining a dress, and also my first in-seam pockets.
I wore this last night out to dinner with friends and then walking up Franklin Rd to view the Christmas lights. I'm very happy with how it turned out. Probably the prettiest summer dress I've ever had.
I also worked on this peasant blouse in a seersucker fabric.This is also from the 7/15 issue #109.
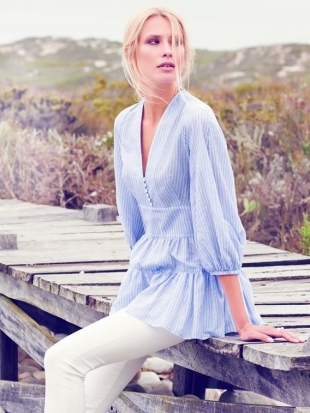 Magazine description: Romantic folk-style blouse. The low V-neckline with loop fastening and pearl buttons make this striped blouse particularly attractive. The sleeves are puffy as they would be in a farm-girl blouse, while two gathered panels of fabric create a romantic look from the waist down.
|
|


Back and side views
This was quite time consuming. The first challenge was to change the pattern layout when cutting out the fabric. I wanted the stripes to run vertically, if I'd used the suggested cutting layout they would have lain horizontally. So I drew a line perpendicular to the grainline on the pattern pieces and used that to ensure it was still on the grain, but going in the direction I wanted. As there is no stretch whatsoever in the fabric I was able to get away with it.
Trying to figure out the instructions for that middle section, below the buttons, and above the bodice, was a nightmare. I couldn't figure out what they were trying to say at all, so in the end constructed it as I thought best. It calls for an inner and outer piece. I put them wrong sides together and then attached to the bodice. This means on the inside of the garment you see the right side of the fabric. I guess the double fold of fabric adds a bit more body to the blouse and gives almost a belt effect. The instructions I couldn't understand were: "baste lower edges of front and back units to upper edges of outer middle sections, right sides facing. Over this, lay inner middle section on bodice, with right side facing wrong side, and pin to upper edge." The funny thing is, now I've typed it out I think I understand it! I believe they mean the front and back units to be the upper bodice part, when sewing I was thinking the unit was the middle sections, so how you attached the upper middle section to the lower middle section made no sense. That is pretty much what I did anyway.
I'm pleased with my efforts on this. The button loops are my first effort at rouleau loops. Thanks goodness I bought a loop turning tool at a half price sale just a few days before making these, it certainly made it easier to turn the fabric. It also features a side zip, my first side zip in a blouse.
The low V neckline, is very low. I will need to wear a camisole under it to feel decent. Also the frill I feel finishes at an unfortunate area - right on the fullest part of the hips, so emphasises the hips. However with the work I've put into it and the fact it is rather gorgeous, despite its flaws, I will wear this.


 Picture from Burdastyle. Description: Culottes are beautifully casual, are super-comfortable and make the calves look slimmer.


 My version
