29 July 2016

Easy dress BurdaStyle 3/16 #105

I had some crazy print knit fabric from SmartDress Fabrics that I loved.  I've had it for a while and couldn't decide what to make with it.  The March 2016 issue had this in it:


When I first saw it in the magazine I really wasn't interested.  However there was a one on Pattern review which I liked.  It has a big pleat in the back  which I really liked for a style factor.   It is almost 2 dresses in one.  The underneath part has the bodice made from lining and attached to the top bodice layer as a lining at the shoulders and armholes.   It could easily be made as separates, though I made it as instructed.  I think it would be nice as separates.  Instead of using lining for the under bodice, normal fabric could be used and a separate top could be used as a cover for the dress for cooler evenings.

I made my usual size 42 (Burda sizing - eek, makes you sound enormous).  I did find it to be quite loose fitting, not as tight as I imagined.
Anyway here is my finished dress.  I don't think the photos do it justice as it is hard to see the separate top and skirt so it looks a bit dowdy.  Trust me, it is much better in real life.


23 July 2016

Barb pants for gym, Kwiksew plaid shirt

I've got another 2 makes for this post.

The first was a very quick make.  Made from leftover fabric, a green ponte, I made some pants to wear at the gym.  These are using StyleArc's Barb pattern, but shortened so they end just below the knee.

I've worn them a couple of times to the gym now and they are great, very comfortable.

For a long time I've wanted a long sleeve plaid flannel shirt.  My go to New Look6963 shirt pattern doesn't come with a long sleeve, otherwise it would have been perfect.  So I had to look for another pattern.  I found this one by KwikSew 4133.

It is possible to make this without the fancy yoke, as the front piece in contrasting fabric is sewn on top of the main fabric.  However I had some blue chambray left over from a previous project that I decided to use.


The one thing I don't like about this pattern is it has snap fasteners down the button placket and on the sleeves.  I would prefer buttons.  The way they have you make the button placket is like a bias binding, so is 5 layers of fabric, 6 where the yoke is.  I experimented with scraps of fabric to see if my sewing machine could manage buttonholes with this thickness, but it couldn't so I had to go with the snap fasteners and I sewed buttons on top of the placket to give the illusion on real buttons.

Apart from the fastening I like this shirt.  If I make it again I would probably do it without the fancy yoke and I would try to find another way of making the placket so I could do buttons/buttonholes.

9 July 2016

BurdaStyle jumpers

I've made another 2 jumpers from BurdaStyle magazines.

The first was from 9/2015 issue from the plus size section #134.


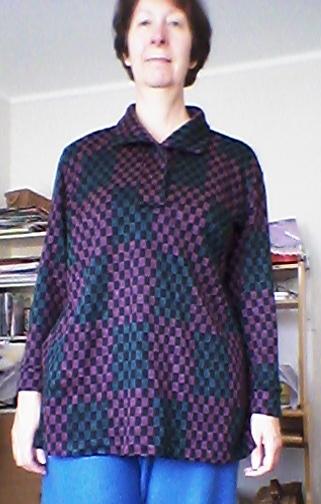
And yet another one from 11/15 issue # 112, the zip shoulder jumper.

The ribbon on the zip shoulder looks blue here, but it is a dark green.

As you can see, they are both the same fabric.  A while back I blogged about my wonderful find at a hospice shop.  This fabric was labelled as approximately 2.5metres.  Well I think it was more like 3 to 3.5 metres, and I had plenty for both the oversized pullover and my new favourite the zip shoulder jumper.

The first pullover is a plus sized jumper with a press stud at the neck and with a polo shirt type collar and gussets under the sleeves.  It has pockets in the side seams and slits at the side seams and also at the cuffs.  My top half is usually a size 42 with Burda, but the plus sizes start at 44.  As this is an oversized sweater anyway, I didn't bother changing it down.  I'm really happy with this.  It will do as a lounging around the house type sweater, and I always like pockets in a top to carry an emergency tissue.  The photo of the back looks as though it has a pleat, but it doesn't. I didn't notice this when I took the photo and can't be bothered re doing the photo.
I did make a mistake with the collar.  The instructions read "stitch along front band edges and collar edge. " I took this to mean the short ends of the collar as well.  However when I came to the instruction that said "insert bottom ends of bands" I realised that by stitching the ends of the collar I had no seam allowance left to insert it and attach to the jumper.  I had to fudge it by trying to stretch out the left collar piece and attach that to the jumper, then stitch the right side of the collar on top of the left side.  I was annoyed with myself, but no one else will probably notice and I know for the next time I do another collar like this.

Total cost for the 2 jumpers was $2.70.