26 December 2015

New Look 6963 Gingham Shirt

My favourite shirt pattern is New Look 6963.  I've made  3 long shirts with sleeves.  I wanted to make a sleeveless version and a shorter length with some red gingham for a nice cool summer shirt.  The gingham was from Spotlight and was $16 for 1.8m x 112cm.  I have a bit of fabric left over.   This was made using view A for the sleeveless version, but C for the length.  You can just see a glimpse here that the armholes are faced with red bias binding.
 
For the first time I tried pattern matching.  It worked!  Side seams, stripes continue across body
 
The top yoke is nearly invisible as the stripes running down match
 
Even the collar and yoke match.
 
I love this and with temperatures in the mid-20's I'll be wearing this a lot over summer.


18 December 2015

Burdastyle culottes and Maria Denmark Kirsten Kimono T

This week I decided to tackle some culottes from BurdaStyle 8/15 #131.  I had some blue broadcloth in my stash, I had 3 metres at 112cm wide.  The pattern calls for 1.75m at 150cm.  At 112cm wide I would have need 2.75 metres, so I have a bit left over, enough to try colour blocking on something, yet to be decided.  This was from Spotlight and was just $11.38.  The culottes have an invisible zip at the side, pockets, and elastic waist at the back.
 Picture from Burdastyle. Description: Culottes are beautifully casual, are super-comfortable and make the calves look slimmer.
My version
When making these I needed to go and get some invisible zips and elastic.  Of course I couldn't resist looking at fabric.  So I got some blue and green cabbage roses knit fabric for jut $6 from Geoffs Emporium and made this Maria Denmark Kirsten Kimono T.  I made a mistake when cutting this out.  The pattern is for front and back to be cut on the fold.  I had only bought 1 metre and didn't have enough for both on the fold, so had to cut 2 pieces for the back.  I carefully marked the centre back seam allowance on the fabric, but then I cut against the pattern, no seam allowance added!  I used the overlocker to create a minimum seam allowance on this, but its a bit tighter than I would normally wear, also the fabric doesn't have a lot of stretch which adds to the tight fit.  However I am still pleased with it as it is such pretty fabric and makes a change from my usual plain t shirts.
And I thought the culottes would look fabulous in a rayon, so got this for $25 from Spotlight.  They really do look good in the rayon, there are pleats at the front which fall much better than the broadcloth.  A problem I always have with RTW is the waistband is always too big, I felt that slightly with the broadcloth culottes, even though they have elastic in the back.  When making these I decided to add a couple of darts to the back. the darts were 1/2 inch at widest and 4 inches long.  I reduced the waistband and elastic by 1 inch.  I felt very daring as this is the first time I've added darts to a pattern that didn't ask for them.  The darts have helped with the fit in the back, and got rid of the puckery fabric. 
I love these culottes.  I'm already wearing the broadcloth and they are so comfortable.  I'm going out to a friends place for a Xmas lunch tomorrow so will wear the rayon ones with my new Maria Denmark T shirt.

12 December 2015

2 more BurdaStyle finishes, dress and peasant blouse

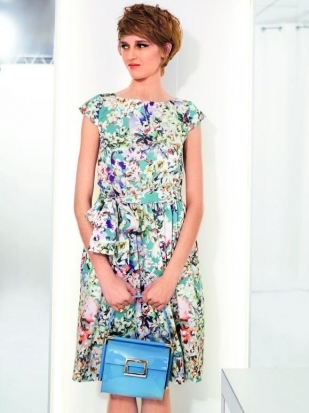
I made this pretty summer dress from BurdaStyle 7/15, #115. 

Платье с мини-рукавами  The magazine description says: Dress with short sleeves and tie belt.  Dress in pastel floral fabric is utterly enchanting with its mini-sleeves and boat neckline.  Elastic, stretched from the inside and sewn on at the waist, ensures that it sits perfectly.  Over it the tie belt is tied in a blow.  The wide band on the hem means that it falls nicely.
The fabric I chose was a voile which was very sheer.  As the pattern didn't have a lining, I had to work out how to line a dress myself.  I was proud of being able to figure it out as I've never lined a dress before and trying to find an online tutorial proved impossible, all I could find was how to line sleeveless bodices.   I chose a red rayon for the lining.  Rayon as it will be cool and breathable for the summer, and red as after trying a few colours under the voile, the red made the red flowers in the voile really zing.  I ended up lining the dress by making the bodice (without sleeves) in the lining fabric by constructing exactly as the voile, including darts.  I attached it at the neck and basted at armholes and waist, so these could then be treated as one piece of fabric when adding sleeves and skirt.  The lining for the skirt was cut the same size as the voile and hemmed.  The skirt piece in the voile had the bottom hem piece attached.  I then basted the voile and lining at the waist, gathered both as one piece of fabric and sewed to the bodice.
 
This dress marked my first time at lining a dress, and also my first in-seam pockets.
 
I wore this last night out to dinner with friends and then walking up Franklin Rd to view the Christmas lights.  I'm very happy with how it turned out.  Probably the prettiest summer dress I've ever had.
My version of the dress
Franklin Rd Xmas lights
 
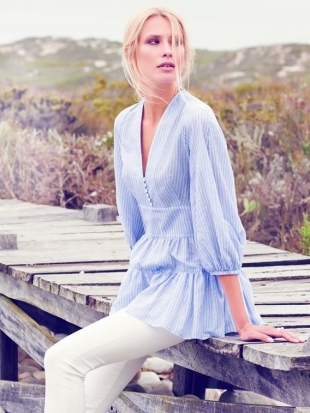
I also worked on this peasant blouse in a seersucker fabric.This is also from the 7/15 issue #109.
Блуза с V-образным вырезомMagazine description: Romantic folk-style blouse.  The low V-neckline with loop fastening and pearl buttons make this striped blouse particularly attractive.  The sleeves are puffy as they would be in a farm-girl blouse, while two gathered panels of fabric create a romantic look from the waist down.


Back and side views

This was quite time consuming.  The first challenge was to change the pattern layout when cutting out the fabric.  I wanted the stripes to run vertically, if I'd used the suggested cutting layout they would have lain horizontally.  So I drew a line perpendicular to the grainline on the pattern pieces and used that to ensure it was still on the grain, but going in the direction I wanted.  As there is no stretch whatsoever in the fabric I was able to get away with it.
Trying to figure out the instructions for that middle section, below the buttons, and above the bodice, was a nightmare.  I couldn't figure out what they were trying to say at all, so in the end constructed it as I thought best.  It calls for an inner and outer piece.  I put them wrong sides together and then attached to the bodice.  This means on the inside of the garment you see the right side of the fabric.  I guess the double fold of fabric adds a bit more body to the blouse and gives almost a belt effect.  The instructions I couldn't understand were: "baste lower edges of front and back units to upper edges of outer middle sections, right sides facing.  Over this, lay inner middle section on bodice, with right side facing wrong side, and pin to upper edge."  The funny thing is, now I've typed it out I think I understand it!  I believe they mean the front and back units to be the upper bodice part, when sewing I was thinking the unit was the middle sections, so how you attached the upper middle section to the lower middle section made no sense.  That is pretty much what I did anyway.

I'm pleased with my efforts on this.  The button loops are my first effort at rouleau loops.  Thanks goodness I bought a loop turning tool at a half price sale just a few days before making these, it certainly made it easier to turn the fabric.  It also features a side zip, my first side zip in a blouse.

The low V neckline, is very low.  I will need to wear a camisole under it to feel decent.  Also the frill I feel finishes at an unfortunate area - right on the fullest part of the hips, so emphasises the hips. However with the work I've put into it and the fact it is rather gorgeous, despite its flaws, I will wear this.

30 November 2015

Cardigan and top finish

This last week I completed my first cardigan.  Made from a lightweight wool from Spotlight and using McCalls 6559. The pattern called for a narrow hem which stretches across the bottom, across the ties around the front and back, so a very long hem.  Trying to press the wool to form a hem and then turn again under was very frustrating.  I managed it on the bottom of the top, but then thought, why not use my narrow hem foot.  I switched to using that on the sewing machine and it was so much easier
 
 
This cost $20.69 for 1.5 metres x 155cm.  No fabric left over
 
 
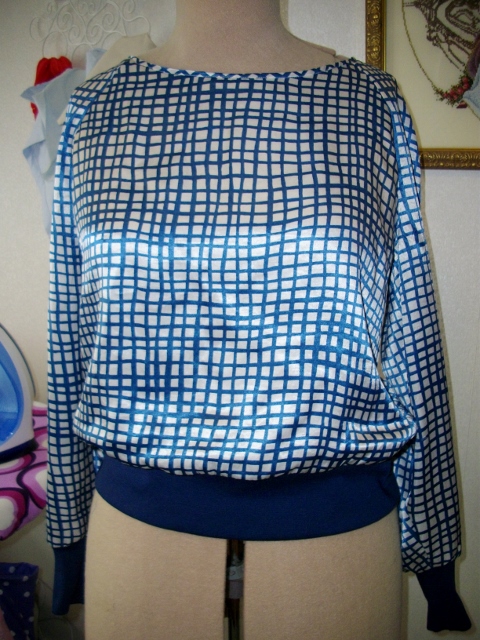
I was keen to make my first garment from a BurdaStyle Magazine. This is from the 8/15 edition, pattern #115.   I've read that the instructions given are minimal, so for my first effort I made this simple top.  It has rib knit at the waist and cuffs.  After I sewed it all up I found the cuffs were way too big.  Now I have skinny wrists, but this was crazy big.  I decided I wouldn't be happy with wearing it as it was so spent an evening unpicking all the stitching from the hems and the lower sleeves.   I then cut the cuffs down to make them narrower.  The sleeves were very wide, so to enable them to sit in the cuffs without a gather, not a bunching, I trimmed the lower part of the sleeves down from the elbow to the cuff.  I'm much happier with how this looks, and it makes a very dressy top.
 
This fabric was from the specials table at Spotlight and was just $2.85 for 1.5m x 136-155cm wide.   I think it is a polyester, there was no description on the bolt.  No fabric left over.  The ribbing I got from Morelands and I got 1 metre for $8 and have enough left over for  another top.


22 November 2015

Maxi, Tshirt, Spirit of Winter and fabric haul

I made another maxi dress last week.  This was a combination of the Maria Denmark Kimono T and the So Sew Easy wrap dress, lengthened to a maxi version.
In my last post I thought I may have enough of the dark blue polka dot left over to make a skirt.  Once I had the pattern assembled and checked against the fabric, there wasn't enough for a skirt.  There was however enough for another Maria Denmark T shirt.


I finished another page on Spirit of Winter.  Only 3 pages to go.

Last week I got my usual catalogue from Spotlight showing their reductions.  Included was a $40 discount voucher to be used when total spend (including discounted items) was over $100.   In fact I ended up with 3 of these vouchers.  In the catalogue was one for me, one for a friend (me), and as I've also signed up online, I received an email with another $40 voucher.  The only catch, if you can call it that, is you can only use one voucher per day.  Not a problem if you are like me and have trouble staying out of the store.   So today I went to Spotlight.  For 2 hours!   I was armed with a shopping list for items from BurdaStyle magazine that I want to try out.

 Their special table has lots of discounted fabric, in addition there was an extra 50% of their super cheap discounted material.  However after much searching, I could only find this on the discount table.
There was no label to identify the fabric but I think it is a polyester.  After all the discounts this was $2.85.  I have in mind to make this from BurdaStyle August 2015, 115a. 


 I also bought this poplin fabric, again with that above top in mind.  Not sure if the poplin may be too stiff as it is a drapey top.  This poplin was $10.12 after discounts

I bought this pretty voile.  I really wanted something with small flowers but couldn't find anything.  This was $22.59 after discounts.
I'm thinking of using this voile for BurdaStyle July 2015 115:

I got this gorgeous seersucker for $17.08 after discounts.


Of all my buys this is the one I'm probably most thrilled with as it was exactly what I wanted for BurdaStyle July2015 109

I also got this broadcloth for $11.38 after discounts.

This is to make some culottes from BurdaStyle August 15 131

I was carefully adding up my purchases and these came to $98.  $2 short of qualifying for the $40 discount, so I bought an invisible zip.  I couldn't remember if the dress needed one or not, but it will get used at some stage.

All in all a good days shopping


15 November 2015

2 more finishes and my Christmas present

I've been hankering after an overlocker for a few months. After doing a lot of online research, plus seeing what is available in NZ I had decided on a Brother 3034D.  My mother had very generously offered to buy me one for Christmas.  Last week I saw Spotlight had a special on the very model I wanted, plus Brother was offering a $50 cashback for November.  Too good to resist.   I dashed out to Spotlight and grabbed one.  A total of nearly $200 off the normal price.  Being worse than a child waiting for Santa, my Mum said I could have it straight away.
 
I spent 2 days just playing with it, practicing stitches and making a workbook with examples of different seams, flatlock, piping etc.  I was then ready to take that big step - actually using it on a garment and hoping I wouldn't cut in the wrong place.
 
Here is my wonderful overlocker
 
 
The shirt was another made with New Look 6963.  The seams were done as usual on the sewing machine, then finished on the overlocker.  The fabric was from Spotlight and the tag described it as a lightweight denim floral.  It is a very soft material.  I bought 1.8metres at 145cm wide for $27 and the pattern used most of the fabric.


The other garment I made this week was another knit dress.  This one was a mash up between the Maria Denmark pattern the Kirsten Kimono T on top, and the skirt from the SoSew Easy Wrap dress.  I altered the T pattern to shorten it and to fit the waist of the skirt.  For the skirt I widened it a bit to give it a bit of flare.The other 2 wrap dresses I made I added elastic at the waist and was going to do it on this dress.  However when I tried it on, it really didn't need it.    I'm quite pleased with the result.  
 
Fabric was another Spotlight, a lightweight ITY, in blue polka dot and I bought 2 metres at 148cm wide for $14.  I have quite a bit left over, easily another 65cm.  I have my eye on another SoSewEasy skirt patterns, for that leftover material.


4 November 2015

Another dress Simplicity 1699.

I found this beautiful material at Morelands.  It was considerably more than I would normally pay for fabric but I just had to have it and had the dress from Simplicity 1699 in mind. The roll wasn't labelled so I'm not sure what it is, but it is a fairly heavy material so I think it may be a cotton sateen, it has a slight stretch to it, so probably has some elastane in it.  I finished it last week and I'm thrilled with the result.  This time I put an invisible zip in instead of the normal zip called on in the pattern.   I've become an invisible zipper convert.
 
I'm going out for High Tea on Saturday so it will make it's debut then.